
Wool Felted Mitered Bowls – Directions

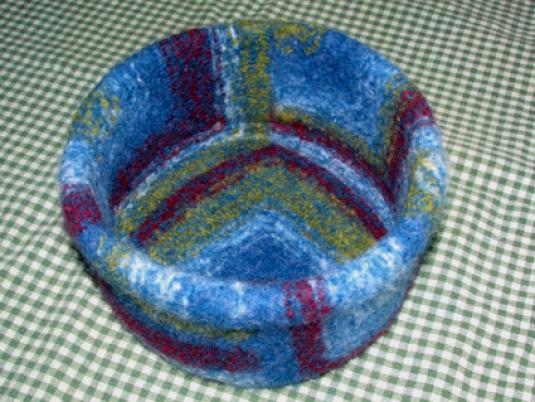
The mitered bowl is knitted in a square shape, but after felting and blocking, it will be round. Each bowl will be unique since color changing is random. Embellish with recycled buttons to make a truly one-of-a-kind bowl!
Caution: This pattern is in Beta Testing. Although we think the instructions are accurate, we may have missed something. Please notify us immediately if you encounter a problem or mistake and we will rectify the problem as soon as possible. Also, this is not a “how to knit” project. We do not explain techniques. Thanks!
Knitting Skill:
Intermediate
Materials:
5 skeins Patons Classic Wool (100 % wool; 223 yards per 3 ½ ounce skein – 204 meters per 100 gram skein) Use 5 different colors
1 US size 10 knitting needles
1 yarn needle
Gauge:
Gauge is not important in this project. Final size of project will depend on knitting tension and felting shrinkage.
Size:
Sizes are approximate and will vary depending on the yarn used and shrinkage when felted. In our example:
12 x 12 x 12 inches prior to felting
6 x 7 x 7 inches after felting
Abbreviations
WS – wrong side
sl1p – slip one stitch as if to purl
k2to – knit 2 stitches together
sts – stitches
p2tog – purl 2 together
Diagram
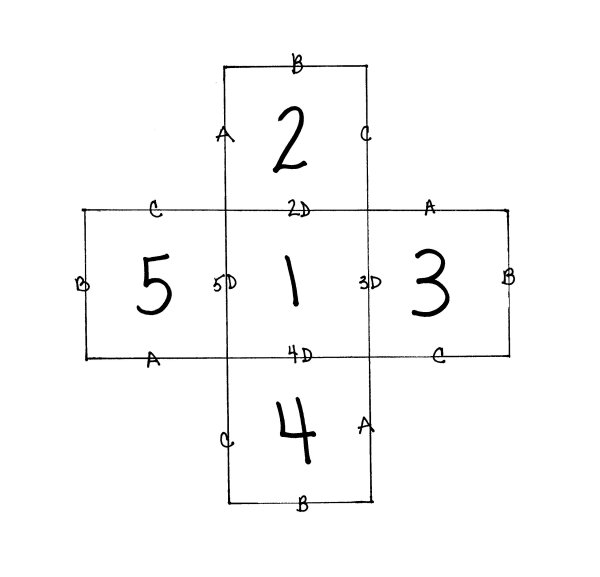
Directions: This bowl is worked in one piece beginning with the bottom. Refer to the diagram for the order of squares to knit. The squares are worked in garter stitch using 2 strands of yarn. All even rows are knit. A double decrease is worked in the center of all odd rows creating the mitered square. Change yarn colors randomly to create 5 unique blocks. Keep all lose threads on the WS.
(Hint: Knit with 2 strands of the same color or use 2 different colors. Mix it up!)
Square One – Bowl Base:
Cast on 48 sts.
Row 1: sl1p, k21, k2tog, place marker, k2tog, k22.
Row 2 and all even rows: sl1p, k remaining stitches
Row 3 and all odd rows: sl1p, k to 2 sts before marker, K2tog, slip marker, K2 tog, knit to end of row.
Continue rows 2 and 3 until 4 sts remain.
Important: The odd rows will form the inside of the bowl. Place all yarn tails on the inside.
When 4 sts remain on odd row: p2tog, k2tog.
When 2 sts remain on even row: sl1p, k1.
When 2 sts remain on odd row: Remove marker and k2tog. Do not bind off last stitch. (This becomes the live stitch.)
Square Two – Side:
From the live stitch, pick up 23 more stitches along side 2D of Square One. (Pick up 1 stitch from each garter ridge.) There are now 24 stitches on your needle. Place marker. Cast on 24 additional stitches using “cable cast on”. (Casting on additional stitches is only done on Square Two.)
There are now 48 stitches on your needle.
Next row: sl1p, k remaining stitches. (This extra row is only done on Square Two.)
Now work these 48 stitches as you did for Square One. Do not bind off last stitch.
Square Three – Side:
From the live stitch, pick up 23 more stitches along side “C” of Square Two. (Refer to diagram.) There are now 24 stitches on your needle. Place marker. Pick up 24 stitches along side 3D of Square One. There are now 48 stitches on your needle. Work these 48 stitches as you did for Square One. Do not bind off last stitch.
Square Four – Side:
From the live stitch, pick up 23 more stitches along side “C” of Square Three. (Refer to diagram.) There are now 24 stitches on your needle. Place marker. Pick up 24 stitches along side 4D of Square One. There are now 48 stitches on your needle. Work these 48 stitches as you did for Square One. Do not bind off last stitch.
Square Five – Side:
From the live stitch, pick up 23 more stitches along side “C” of Square Four. (Refer to diagram.) There are now 24 stitches on your needle. Place marker. Pick up 24 stitches along side 5D of Square One. There are now 48 stitches on your needle. Work these 48 stitches as you did for Square One. Bind off last stitch leaving long tail for sewing side seam.
Finishing:
Using the yarn tail from Square Five, sew side “C” of Square Five to side “A” of Square Two.
Secure and weave in all lose ends.
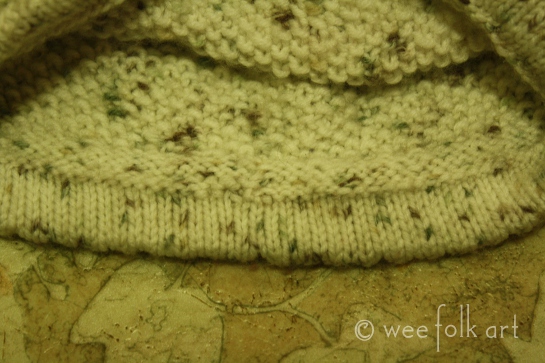
Turn bowl right side out. Fold rim over 1 inch to right side of bowl. Whip stitch rim to outer bowl. (This creates a more rigid rim after felting.)
Felting:
Felt bowl using the instructions found on the yarn or your favorite method.
My favorite method for non specific sized items (i.e. purses and bowls as opposed to shoes and clothing.) is: place in washing machine using on the hottest setting possible. (I have a front loading with a sanitizing setting. VERY hot!) Add laundry detergent to aid in felting but NO fabric softener. Through in items to aid in agitation. (I removed the Velcro and snaggy edges of a pair of my grandsons 2T snow boots that he outgrew. Works great! Some people use towels or old jeans. Anything that will beat the felting without snagging it.)
Blocking: Place bowl over a cylinder shaped plastic or tin form. You want a tight fit. Stretch bowl so sides are the same around the bowl. Allow to air dry. This may take a couple of days to fully dry. If using a metal tin, line it with plastic wrap to prevent rusting.

2 Comments
Martha Morrison
Thanks for the pattern. It looks interesting.
I don’t see how many rows to knit anywhere. Just row 2 & 3. Then I’m unclear on what to do at the end of those rows. It says to k remaining stitches, & knit to end of row, but then it says to continue until 4 sts remain.
Thanks.
Kimara
This is one of those patterns that it actually makes more sense once you get started. Really 🙂 You don’t need to worry about how many rows you are knitting, just how many stitches remain on your needle. You knit all even rows. On each odd row you will be decreasing 2 stitches. So… you cast on 48 stitches. Row 1, you will decrease 2 stitches, so there will be 46 stitches on your needle. Your next even row, you knit. Your next odd row, you decrease 2 stitches, so there will be 44 stitches on your needle. Keep doing this until there are only 4 stitches left on your needle. If you were counting rows, that should be row after 43. At that point, just follow the directions until you are down to one stitch remaining on your needle. Then follow the next part picking up stitches.
I hope this now makes more sense to you. I truly do believe if you got started, it would make more sense. Although this is any easy knit… you are simply knitting a garter stitch… it can be confusing with picking up stitches, etc. Wishing you much luck and I encourage you to give it a try. It is such a fun knit when you get the hang of it.
~Kimara~