
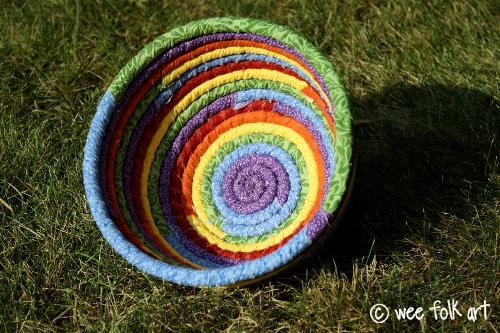
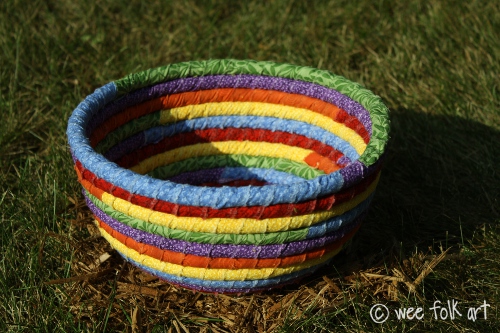
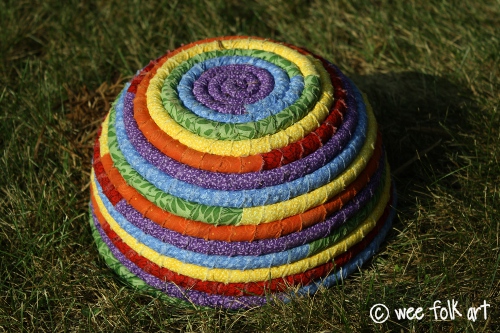
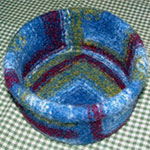
Pixie’s Rainbow Coiled Rag Bowl Pattern
Learn how to hand sew your very own coiled rag bowl. The rainbow coiled rag bowl pattern is easy to make and can fit in many decorating schemes by changing the fabric colors.

EDIT: Stop by HERE to see another Rag Bowl I was working on.
I’ve already mentioned that Pixie has a birthday coming up and all the gifts I’m making for her have a rainbow theme. When thinking about all the little things I’ll be crafting, I thought (dangerous past time, I know 🙂 that I needed something to put them in. Back in the 80s I was really into using the upholstery cording to make all sorts of things. I haven’t used it in years, so I decided, what fun! So, here are the directions for Pixie’s Rainbow Coiled Rag Bowl. I’ll be sharing my “stuffings” as I get them done!
Rainbow Coiled Rag Bowl Pattern Materials:
- new or used light to medium weight cotton
- (I bought 1 yard each of 6 rainbow colors and have tons left for other projects)
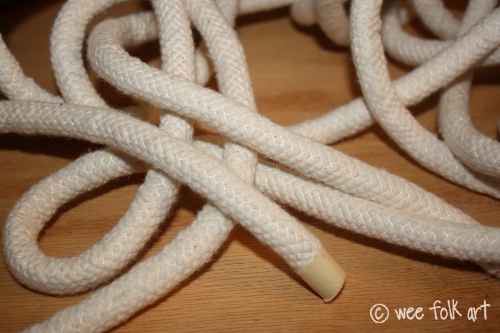
- 1/2″ upholstery cording
- (I bought 10 yards and used 9. Yardage depends on the size of the bowl you cover)
- embroidery floss (2 strands) or quilting thread (needs to be heavy duty)
- sturdy needle
Rainbow Coiled Rag Bowl NOTES:
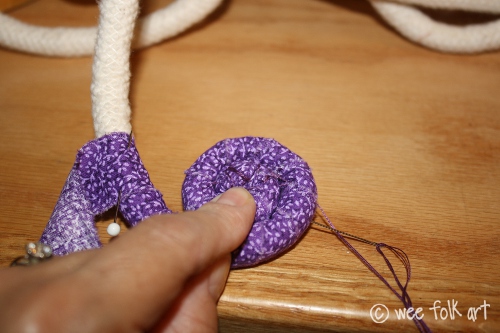
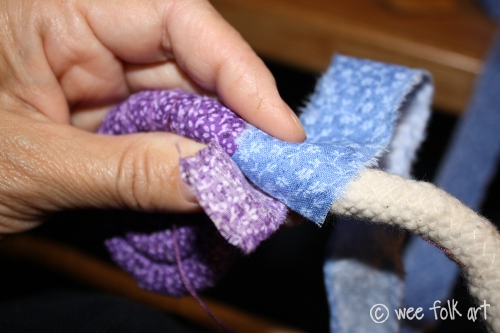
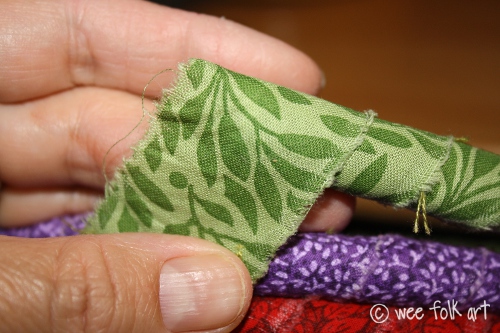
BEFORE YOU BEGIN… IMPORTANT NOTE ABOUT TACKING: As you start assembling your bowl, you will be asked to tack the cording together to form the bowl. When tacking, you must go through 2 pieces of cording; the piece already part of the bowl, and the new piece you are adding. The method I used was to go through the center of a new piece, and bring the needle out halfway through the cord below.
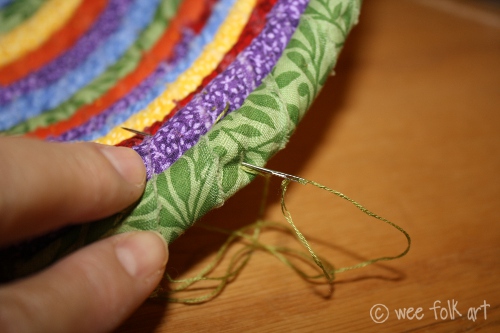
I would then push the needle back into the cord, close to where the thread came out, and angle my needle so it comes up through the center of the strip of the new cord that has not been tacked down yet. (Sounds much more complicated than it is. Check out the photo!)
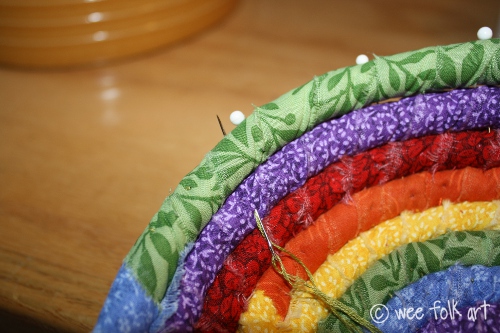
Pull the thread tight enough so it holds the coils together but not so tight that it begins to dimple the cord. I then put a very small tack stitch where the thread came out to stop the threads from loosening up.
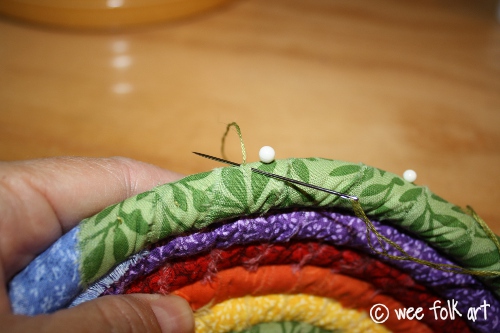
When tacking your bowl together, you want to keep the outside of the bowl stitch free. So as you form your bowl, think about how the next piece of coiling will be added to the bowl, and make your tack stitches so they will be hidden by the next row of cording. On my final row you will be able to see your tacks, but if you use matching thread, and evenly space your tacks, it will not detract from the finished bowl.
Rainbow Coiled Rag Bowl Pattern Directions:
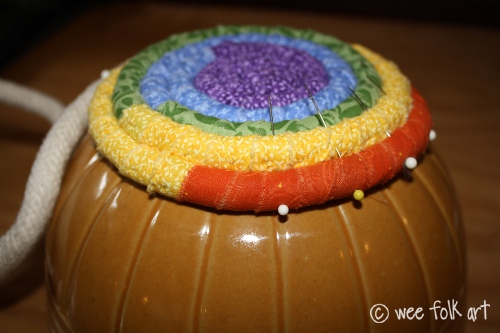
Pick a bowl you want to use as a form. My bowl was 4″ at the base, 8″ across the top, and 5″ high. Turn the bowl over so the bottom is up.
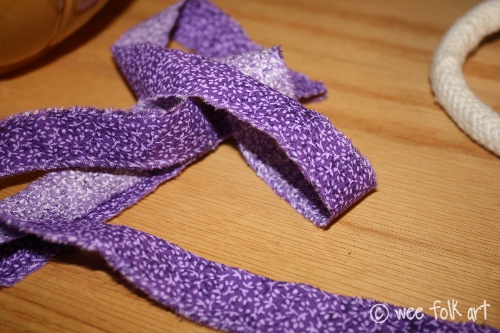
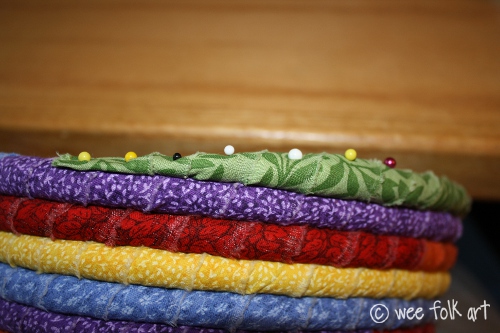
Rip your fabric in 1″ strips. Again, how many strips you need depends on the size of your bowl. I needed 4 strips, 1 yard long of my purple, blue, green and 3 strips of yellow, orange and red. I suggest you rip as you go, so you only rip as many strips as you will actually use. You will also need a 2″ square of the first color you use.
Begin by wrapping the end of the cording with the 2″ square of fabric. I wrapped my matching embroidery floss around the outside of the fabric to hold in place before I tacked it to the cording.
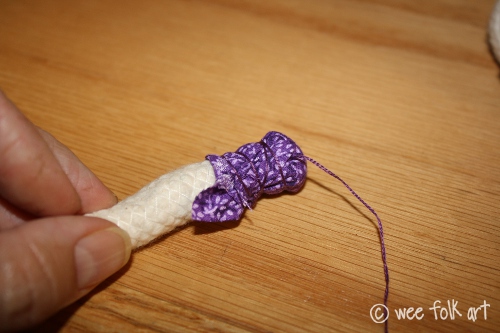
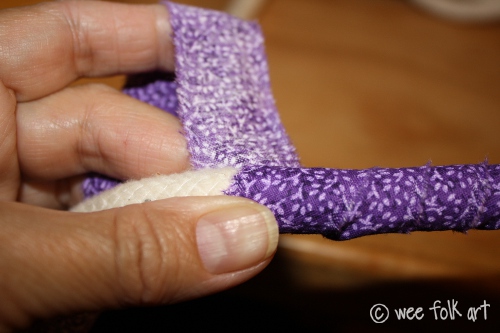
Take your first color and place the end of the strip near the tip of the covered end of the cording. Pin in place. Begin wrapping the cording with a strip by wrapping on an angle, always overlapping the previous piece by 1/2″. Continue wrapping the cord firmly, slightly condensing the cording as you go. Stop when you are about 3″ from the end. Pin the strip to the cording so it does not untwist.
To start forming the bowl, begin coiling the covered cording, tacking as you go. (See note above about tacking.)
To add a new color, you can either sew the pieces together by simply overlapping and stitching, or you can tuck the new color under the old color by 2” – 3” and continue wrapping as if they were 1 continuous piece. The tacking and wrapping you do will hold them together, and since this is a rag bowl, some unfinished ends showing are acceptable HOWEVER, make sure any of the unfinished ends are in the inside of the bowl, not the outside, and you can trim back some of unfinished ends on the inside to “neaten up” the bowl when you are done.
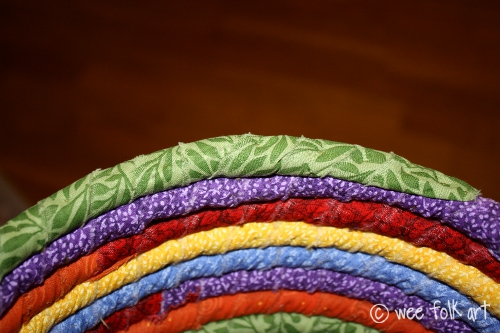
To begin with, you can work on a flat surface. Periodically place your piece on the bowl bottom. When your coil is as big as the base of the bowl, continue wrapping the cord with the strips as you have been, but now, as you coil the wrapped cording, use the bowl as a form. Wrap the cord around the bowl, pinning the cording to the previous coils, on the angles the bowl is creating. Continue tacking in place as you build up your bowl.
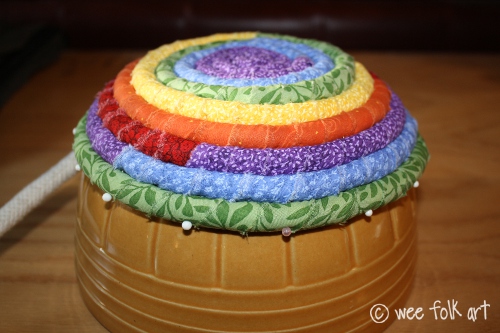
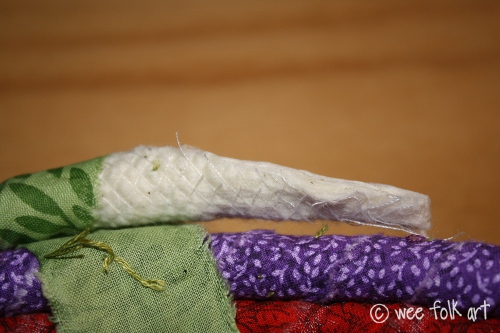
When your bowl is as tall as you want, cut the cording. Then, taper the last 4” of the cording before wrapping it. Wrap in the same manner. The cording will diminish in height, but you should keep the width the same. Pin in place, and tack as before. You may want to put a couple of extra tacks in at the very end.
You might also like…
Napkin Lined Autumn Potpourri Bowl |
Wool Felted Mitered Bowls |
The Birth of a Bowl |

46 Comments
nightshade
OMG!!! This may be the most awesome thing you’ve ever made and that’s saying a lot. I LOVE, NO, I ADORE THIS. Lucky little Pixie. If I tell you when my birtday is… hehe. BEAUTIFUL!!!
Shirley in Canada
This is a very well done tutorial! Thank you!
Leithaakagrover
Wow this is so cool thanks so much for sharing. When I was in grade school we made something similar to this using yarn and rope. We called it Native American basket weaving. I will be making this with my kids.
rae
i gasped when i saw this beautiful rainbow bowl! looks like a lot of fun to make, too. 😉
KJ@letsgoflyakite
The other day my daughter asked are rainbows goodness? I said yes. That bowl is a labour of love and heaps of goodness.
Brie
Love, love, love it!!!! I can’t wait to get a chance to make one!!! Thank you for the pattern!
My Year in Haiku
This is wonderful!! I started ripping my fabric… um, is there a trick to that? Mine did not rip straight and so the pieces aren’t 1 inch wide at all. Can I just cut it? Any advice for me?
Kimara
It really depends on the type of material you are using. The light weight to medium weight cottons (often referred to as calicoes) should rip quite nicely. When you start your rip, cut along a thread for about 1 – 1 1/2". You need a big enough piece to get a good hold on. Then grab the strip and the remaining fabric tightly, and rip.
If that doesn’t work, you can certainly cut the fabric, that just takes longer. Eventually it will get the frayed look that I find so attractive on these bowls.
Another thought… your fabric may not be on grain, so when you are cutting into the fabric, you may be cutting through multiple threads, thus you won’t get a true strip. You can try straightening your fabric. Use this tutorial… Straightening Fabric Grain. But just remember… it is a "rag" bowl, and the strips don’t need to be perfect to turn out.
Hope that helps. Let us know how it turns out.
My Year in Haiku
Thank you for taking the time to reply to me. I will see what I can do…. these are just so great – I have to make one!
Guest
This is absolutely beautiful! I have interested in making something similiar for awhile and have always been intimidated by the process of actually sewing the ropes together but this looks pretty simple! Thank you!
Also, great blog, this is my first time here, I will add you to my feed.
Kimara
When they do the ones you sew on the sewing machine, they also use the thinner roping so a needle can go through it. I love the thicker roping. You’ll be surprised at how firm and sturdy it turns out. Have fun and welcome to WFA!
Anne Weaver
It’s GORGEOUS!!! I linked to your tutorial over at Craft Gossip Sewing:
http://sewing.craftgossip.com/tutorial-coiled-rag-bowl/2010/09/10/
–Anne
Laura S.
I’d really like to make one of these. Is a bi intimidating. May see if my mom wants to help me sometime when she comes to visit. Your bowl is beautiful. I’m due in 4 weeks(with my second boy) and thought this bowl would make a good storage place for baby toys. You know how babies love to take things out and put things back in. Thanks for sharing! I’m new to your site. I’ll have to look around 🙂
Kimara
This really isn’t difficult to do, but I understand why it looks a little intimidating. The biggest secret is to make sure you secure each stitch you make so it isn’t trying to unwind while you are working. Hope you decide to give it a try because they really aren’t difficult and they are really sturdy and would hold up to some serious "put and take". Welcome to our site. Hope you have fun looking around and come back often!
Cheryl Gibson
Can you please send me the details?
I made my first quilt last year.
This would be a great gift.
Kimara
Hi Cheryl,
I’m not sure what you need. You are commenting on the coil basket that has the complete tutorial. Was there something else on the site you needed help with? Just let me know and I’ll try to help!
~Kimara~
Suzy
Awesome job!!! What a beautiful gift!
suzy
Mruna
Thank you so much for the tutorial…I love the bowl and I’m definitely going to make a few!
JenK
This is beautiful! I am working on one for my daughter now, and it’s so easy. 🙂 I do have a quick question, though, if you have a minute to respond. How frequently do you tack the rows together? I tend to overcompensate and secure things together far more than I need to, just in case. I have been tacking about every inch so far; I’m wondering if I need to do it more frequently or if that’s just the worrywart in me talking. 🙂
Thanks for sharing this, and I love the site!
Kimara
I "over engineer" too 🙂 I tacked mine every time I overlapped the strip again which = about every inch. I’m glad I did because it is so sturdy and is holding its shape even with the kids playing with it all the time! Would love to see your bowl when you are done.
Dee
I LOVE Love Love this bowl and I would really like to make one myself!! Can you tell me, for a beginner who has never done anything like this before (I’m mainly a papercrafter, but I have done some needle felting and sewing, but just basic, easy things) would it be better to start with a smaller bowl? Or would smaller actually be harder? And, does the cording come in different widths and is a certain size easier or harder to work with? Also, about how long does this bowl take, once all the fabric is ripped, to complete?
Do you have any other tips before I get started?
Thank you so much for this wonderful tutorial, a beautiful project and all of your help!
Dee
sprytebyrd@gmail.com
http://sprytebyrd.blogspot.com
Anna
From reading the other comments apparently I’m the only one that don’t understand how your stitching it. If I go down from the top through the new cord and out the one one before it, then turn around and go back up through it all and do a little tack stitch to stop loosening, then that means my thread and needle are at the top. If I move over an inch and do it again I will have an inch of thread showing each time I move over…WHAT AM I DOING WRONG? Obviously somehow I’m not understanding. PLEASE help me! Sincerely, Anna
Denna
I actually had the same question, would it be possible to answer to it here, so that everybody can see it and not trouble you every time? I am converting our house to Waldorf-oriented and need all sorts of baskets, this would be so perfect, I just hope they don’t take too long to make. Thank you!
Kimara
Basically, think of a zigzag… or making Vs. Here are my instructions:
I would then push the needle back into the cord, close to where the thread came out, and angle my needle so it comes up through the center of the strip of the new cord that has not been tacked down yet.
When you ANGLE your needle, you’re moving through the roping on a diagonal. When you push your needle through the top cord to the bottom do it with 1/2" angle, then when your bring it back up, do it with another 1/2" diagonal. On the top surface the last tack and the new one you make will be about an inch apart. All the thread will have been hidden inside the roping.
I’m hoping if you go back and look at the photos closely now, it will make sense… I hope, I hope!
Denna
Oh, now it clicked together, of course, how stupid of me! Thank you for your patience!
Kimara
Trust me, I know it’s hard to take directions online, even with photos, and have them all make sense! Wish everyone could just sit next to me and craft together. It would be far easier to explain 🙂
Anna
Would it be possible for you to email me your answer?
Anna
antonella
your project in my blog!
thanks so much for your ideas!!!!
antonella
Guest
I just read this post http://www.makeit-loveit.com/2012/06/hmmmmm-what-to-do.html and then found this tutorial on Pinterest! http://www.duitang.com/people/mblog/27356524/detail/
Kimara
It is an awfully frustrating situation. You feel so violated when someone abuses copyright laws. I wrote a more long winded post on Ashley's blog if you'd like to read it. I think the best way we can fight this as a community, is to make sure when we link to something, it in fact does go back to the real source. If you can't find the original source, don't Pin or link to it. Thanks for looking out for us 🙂
Diane
I found this on Pinterest in another language and see from your comment that it was not with permission. I searched for “wee folks” and landed here. I would love to pin this. Is it okay to do so since it will link back to your site? Thanks!
Kimara
We'd love to have you pin the bowl. I've made many of these now. The color fabrics you use make the bowl look so different. Hope you get the chance to make one. Thanks 🙂
Diane
Awesome! I have already been checking out supplies for this.
Jackie
I found the same thing and searched to find y’all because of the copyright on the pictures. I went back and added the correct link in the comment section of the pin. Not sure that helps…
Thanks for the great craft and pattern!
Kimara
Thanks so much, Jackie. And it certainly does help. Not only do people deserve the proper credit for their work, but when links are correct, it gives people an opportunity to enjoy other projects on a site. I truly appreciate the effort you made! ((hugs))
Bex
Just loving this bowl…do you think the same technique would work flat for a rug rather than shaping it around a bowl?…I have just the spot for a lovely round rug/mat like this..
Thanks
Bex
Kimara
Yes, I do think it would work just fine. I suggest you use regular rug or quilting thread to sew it together, though. Regular sewing thread would break too easy. Let us know if you give it a try. Would love to see photos, too 🙂
Pam @Threading My Way
Beautiful bowl!!! Looks fabulous and it’s totally practical too. Pinning.
CaySedai
I got an email from Pinterest saying they deleted one of my pins because of a takedown notice. I had originally pinned from Pinterest without checking to see where the pin led to, so I went looking for the original. It was this bowl. I’m now following you on Pinterest and have pinned this page from your board. I’m sorry that I didn’t realize the pin wasn’t leading to your site. But now you have a new follower on Pinterest and Facebook. 😉
Kimara
I pin so many things, too, and to be honest I don’t always check the origin unless I am going to share them on Facebook. There are some groups that knowingly steal other people’s work and post them on their own pages, with the original artist not receiving any of the credit. I will say Pinterest is wonderful at dealing with this if you bring it to their attention.
Please don’t feel bad. It happens all the time. I am thrilled you actually took the time to track us down. There is a wonderful community that hangs out here on the blog, on Pinterest, and our very active Facebook page. So glad you have become a part of that group and hope you make yourself right at home! ((hugs))
~Kimara~
Vera Lucia
Amei mim apaixonei por estes trabalhos
Kimara
Muito obrigado. Nu00F3s estamos contentes que vocu00EA gosta. ~Kimara~
Pingback:
Pingback:
Barbette Mckenzie
Do you ever make rugs? If so do you have a tutorial for that? If not can you recommend a site? I would be interested in trying a rug. Your bowls a beautiful and fun. You have a great tutorial and a marvelous writing style.
Pingback: